1. Istio — Getting started guide
Istio — https://istio.io — is a new Microservice service mesh manager for making microservice deployments less complex and eases the strain on development teams.

Blogposts, Tutorials, Code Samples & Videos. All you need to get started.
Kubernetes (aka k8s) is an open-source system for orchestrating containerized applications. It allows automating deployment, scaling, and management of clusters for running cloud-native applications. In this tutorial, I am going to show you how it is possible to deploy a simple cluster on the cloud with a few clicks through the Oracle Cloud Infrastructure (OCI) Web console. For this purpose, I am going to use the Container Engine for Kubernetes (OKE) available under the “Developer Services” section within “Compute” services.

Before creating a new cluster, it is important that all the prerequisites listed here are fulfilled. Assuming we are Administrators in the tenancy, it is necessary to create the following policy under the root compartment:
allow service OKE to manage all-resources in tenancy
This policy will allow OKE to manage networks, instances, storage, load balancers, etc. on our behalf.
For this tutorial, we also need to have OCI CLI and kubectl on our local machine.
In this tutorial I am going to use the OCI datacenter located in Frankfurt, therefore the OKE console is reachable at “https://console.eu-frankfurt-1.oraclecloud.com/containers/clusters” in this case.
The next step is to click on the “Create Cluster” button and the following interface will show up:
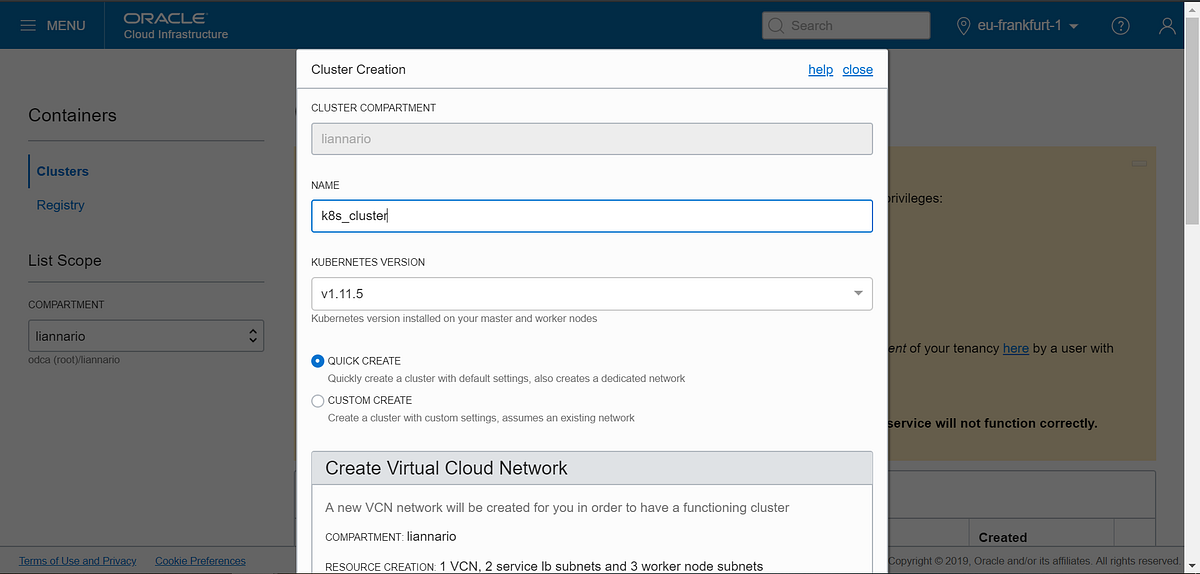
By choosing the “Quick create” option, all I need to enter is the Cluster name and Kubernetes Version (v1.11.5 at this time).
OKE by default creates a new Virtual Cloud Network (VCN) with 2 subnets for Load Balancers and 3 subnets for master and worker nodes, an Internet Gateway, a route table, and 2 Security lists. In addition, it creates a new node pool with 1 node for each subnet (3 nodes in total in this case). The number of nodes for each subnet can be increased at this point or can be scaled up later, without service interruptions.
Before clicking on “Create” button, I ticked the two checkboxes that allow enabling Kubernetes dashboard and Tiller (Helm) on the cluster. The former is useful for debugging and monitoring purposes, while the latter allows having Tiller installed and configured automatically for us.
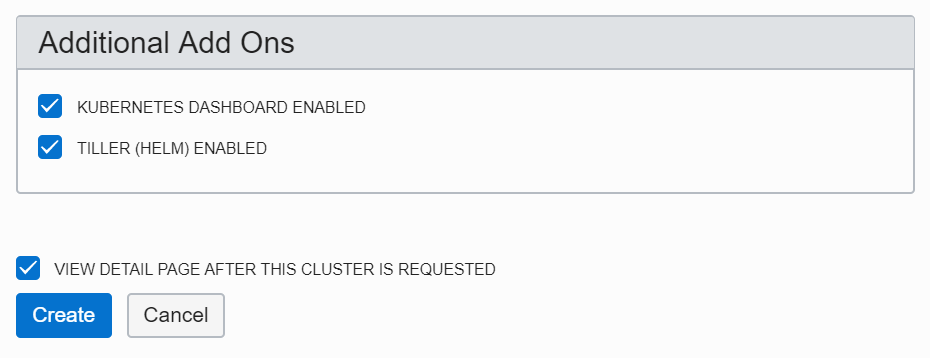
Upon clicking on “Create”, OKE will start the creation and deployment of the new cluster on Oracle Cloud.
Using the OCI CLI, it is possible to download the Kubeconfig file generated by OKE and use kubectl to manage the cluster.
In the cluster landing page, after clicking on “Access Kubeconfig”, a popup window will show the commands to run on our local machine in order to download the kubeconfig file. In my case the commands are as follows:
# Create a folder for storing kubeconfig file
mkdir -p $HOME/.kube

# Use OCI CLI to download the kubeconfig file on the local machine
oci ce cluster create-kubeconfig — cluster-id ocid1.cluster.oc1.eu-frankfurt-1.aaaaaaaaaezgkzraasadasdassdzrwhe2gcobzgcztmnjwgjqt — file $HOME/.kube/config — region eu-frankfurt-1
It is also necessary to point the KUBECONFIG environment variable to the _kubeconfig_file downloaded previously.
# Export the environment variable
export KUBECONFIG=$HOME/.kube/config
Now I can run the following two commands to get more information about the cluster (these are also displayed in the Web console):
# Get info about k8s nodes
kubectl get nodes

# Get info about k8s cluster
kubectl cluster-info
They will show information about the 3 nodes IPs and master Load Balancer address. These can be useful in case we want to connect to any of the nodes via SSH.
Using kubectl it is also possible to run a proxy on the local machine to connect to the Kubernetes dashboard:
kubectl proxy
Now I can use any web browser and navigate to http://localhost:8001/api/v1/namespaces/kube-system/services/https:kubernetes-dashboard:/proxy

The dashboard shows many details about the cluster, including pods, services, nodes, persistent volumes, and deployments and also allows to perform operations via a web interface. As you can see from the screenshot above, Tiller is one of the services running on the cluster and has a Cluster IP assigned to.
OKE is only one of the great services offered by Oracle Cloud. There are many others that can be explored to enhance your cloud-native applications.
You can try the steps I described in this tutorial by registering a free trial account here, and take the opportunity to discover many other services offered by OCI.
Luca Iannario @liannario
Developer Advocate at Oracle. When I am not on the clouds, I like travelling and taking pictures.
Istio — https://istio.io — is a new Microservice service mesh manager for making microservice deployments less complex and eases the strain on development teams.
How to deploy a simple Kubbernetes cluster with a few clicks through the Oracle Cloud Infrastructure (OCI) Web console.